Made by Madame Ladybug

Just another WordPress.com weblog

Mini Monster August 21, 2009

Filed under: Kid Stuff,Sewing — madameladybug @ 3:01 am
Tags: , , ,

My daughter and I were surfing the web yesterday to “look for inspiration”. It is just a fun little thing that we do. We just look for pretty pictures and cool stuff. We managed to come across some work by Lizette Greco. She takes drawings done by children and brings them to life with her plushies. Both Lily and I thought that this was just the coolest thing.

Earlier in the week, Lily had a dentist appointment. Waiting in the waiting room is so boring and I would not let her bring her Nintendo DS with her. I had a notebook in my (new bird) purse, so I pulled it out and told her to draw a picture or something. Since she is 9, she scoffed a little and told me she was not a baby anymore. Then she took the paper and sarcastically drew a little monster and gave it back to me. I (bad influence that I am) replied with equal sarcasm that I was going to cherish it forever. This made her laugh and made the dentist appointment less nerve-wracking for her.

I still had the notepad in my purse and after seeing Lizette’s work, I felt inspired to attempt to bring Lily’s drawing to life.

So today, while Lily was at school, I got out the drawing, traced it onto plain white copy paper and cut it out to use as a pattern. I have a bunch of little felt squares that I keep for the kids to make little things with. I picked up a few of those, some black thread, and some polyfill that I happen to have for God-knows-what purpouse since I have never made a stuffed animal in my life.

Then, I plopped down in front of a Golden Girls marathon and handstitched Lily this little guy. (He does not have a name yet.)
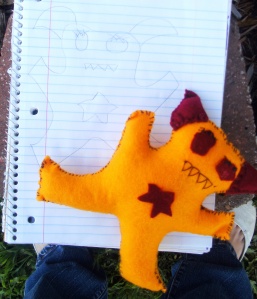
MiniMonster

Before you say anything about the amauteur looking stitch job, please know that I chose black thread and did the stitches intentionally imperfect in order to capture the “child’s art”-ness of it. I embroidered the mouth and eyelashes with the same heavy ($1 a spool) black thread.

Then I waited for her to get home. This was a rather long wait since she wasn’t paying attention and did not get off the school bus. I (naturally) freaked out and called transportation and they brought her right back. After I slowed my heart rate from not knowing where my little girl was, I showed her the mini monster though… and it made her smile.

I consider that smile to be more than worth the time it took me to make this little critter!

Now tomorrow I better come up with something to make for Miles…


A Flower For Miles August 3, 2009

Filed under: Jewelry and Accessories,Sewing — madameladybug @ 6:20 pm
Tags: , , ,

Miles

Sadly, Miles has no flower…

My kids got new church clothes this week. Lily picked out a few dresses and Miles picked out a couple dress outfts. What he wanted most was a tuxedo though. Tuxedos for children are a little difficult to find though. nstead, he got a white shirt and black pants and black tie. That worked for him… except he wanted a flower to put in his pocket. (What can I say? My boy has class!)

Since he is only 6 years old, buying a boutinniere seemed silly. Instead, I quickly made him a (VERY inexpensive) reusable one out of a couple of felt scraps. Here’s how:

Materials:
One felt scrap (red) was a 2″ by 18″ rectangle.
One felt scrap (green) was a 1″ by 3″ rectangle.
Tacky Glue
One Bread Tie
One cotton ball
Needle and Thread (green)
One safety pin

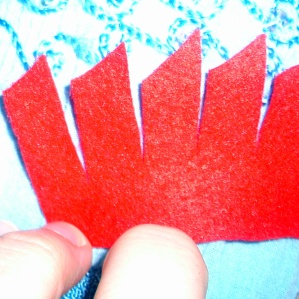
1. Cut the red scrap down in a straight line every quarter inch for the entire 18 inches, leaving just 1/2″ at the bottom. Then take these little flaps and trim the top on a diagnol cut.
Flower Pieces

2. Take a bread tie and glue it down between the first and second flaps. Roll the red scrap in, covering the bread tie and glueing the base as you go.

3. Fluff the petals of the flower as desired.

4. Glue the green rectangle of felt around the base of the flower.

5. Blanket stitch the green felt together wth a needle and thread.

6. Pull apart a cotton ball and stuff it inside of the green base to give a little extra plumpness.

7.Take the needle and thread and do a running stitch around the bottom of the base, pulling slightly to gather the felt.

8. Pin flower to pocket of shirt.

Flower


You have to start somewhere… July 20, 2009

Filed under: Sewing,Skirts — madameladybug @ 5:16 am
Tags: , , , ,

Welcome to my craft blog! I have decided to start a new blog, seperate from my personal blog, just about sewing and crafting.

I am learning; and while my ultimate goal is to begin producing items worthy of being sold, my goal for this blog is simply to log my creations and have fun. This blog will help me to keep my focus on learning my craft. And hopefully, I will one day get some encouragement from my readers to move forward with my dreams.

For now, I will post my first project. It is a turquoise skirt made of  cotton pique. The skirt is A-lined and knee length. It zips in the back as well as closes above the zipper with a hook and eye closure.  The waist band is interfaced. The skirt also features darts in the front for shaping.

The model in these pictures is my mother. The pattern was drawn according to her measurements. I made this skirt for her.

Here is the how-to for this skirt:

Materials Needed:
1.5 yards cotton pique
.5 yard fusible interfacing
zipper in color to match fabric – 7″ long
hook and eye closure
sewing thread in color to match fabric
basting thread in contrasting color

1. Assemble the Back Pieces. With the right sides facing, pin the two back panels together along the straight center edge and baste. Leaving 8 3/4″ opening at the top unsewn, stitch seam with a straight stitch. Remove basting thread. Press the seam open with an iron. Topstitch on each side of the stitched section of the seam.

2. Join the Sides. Place the right sides of the front and back pieces against each other, pin and then baste the sides. Sew the two seams on each side with a straight stitch. Press the seams open. Topstitch on each side of the stitched section of the seam.

3. Attach the Zipper. Center the zipper over the opening at the top of the skirt with the zipper teeth 1 3/4″ below the top edge. Using the zipper foot on your machine, stitch the zipper in place. First stitch down one side of the zipper from the bottom to the top. Then repeat on the other side. The adjust the garment and sew across the width of the zipper at the bottom.

4. Finish the Waistband. Follow the directions on the fusible interfacing to attach it to the skirt. Then double the extra 1 1/2″ of fabric above the waistband over the interfacing to cover it completely. Pin together. Stitch on the top of the Skirt 1/4″ from the edge, being sure to stitch through all three layers. Close off the back fold along the zipper on the back part of the skirt with small slip stitches done by hand. Attach a hook and eye above the zipper by hand.

5. Add darts. Using tailor’s chalk and a ruler, mark where the two darts in the front will be placed. Pinch the fabric in the back along this dart line and pin in place. Turn garment inside out and straight stitch in the darts.

6. Hem. Try the skirt on to determine where the bottom hem should be. Mark the hem line using tailor’s chalk. Take the skirt off and use an iron to turn the hem under, toward the inside of the skirt. Baste and try on again to ensure that the hem is properly formed all around. Stitch hem into place. Remove basting stitches.